We will create a simple recorder using recorder.js, a wrapper for the Web Audio API. We will implement the UI by writing p5.js, the browser version of Processing, in TypeScript.
Field recording: Recording natural or environmental sounds outside a studio I made this to meet the niche demand of wanting to easily collect natural and environmental sounds, and send them to a PC for real-time processing.
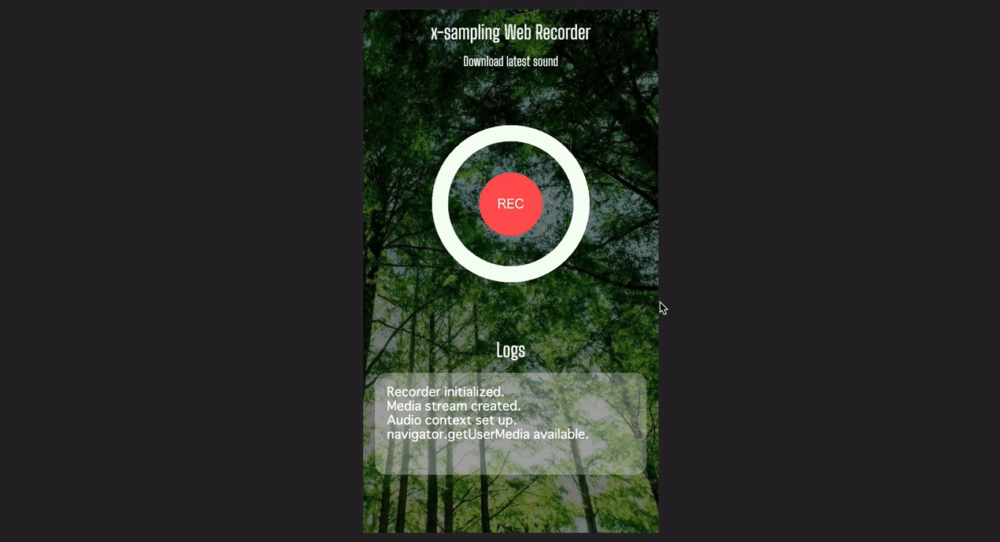
Final Image
It's just a screenshot, but it works like this.
You can (probably) quickly set up the environment and run it, so please try it if you are interested.
Recording audio on the front-end with recorderjs
GitHub: https://github.com/mattdiamond/Recorderjs
First, here is a demo: Simple Recorder.js demo
It's like a wrapper for the Web Audio API. It's an excellent tool that allows you to easily start, stop, and save recordings by passing an instance of AudioNode.
You can define a function to start recording like the following, so you just need to call it on any event.
1let recorder: Recorder;
2
3const startUserMedia = (stream: MediaStream) => {
4  audio_context = new AudioContext();
5  let input: AudioNode = audio_context.createMediaStreamSource(stream);
6  recorder = new Recorder(input);
7};
8
9const startRecording = () => {
10  recorder && recorder.record();
11};
Then, you can get a wav Blob object with a single call to this Recorder.exportWAV() method, so you just need to POST it via ajax.
1recorder &&
2  recorder.exportWAV((blob: Blob) => {
3    let url = URL.createObjectURL(blob);
4    let fd = new FormData();
5    fd.append("data", blob);
6    $.ajax({
7      type: "POST",
8      url: "/",
9      data: fd,
10    }).done((data) => {
11      recorder.clear();
12    });
13  });
Saving the POSTed wav file with flask
On the flask side, you can write it like this.
1from flask import Flask, jsonify, request
2
3
4@app.route('/', methods=['POST'])
5def uploaded_wav():
6    fname = "sounds/" + datetime.now().strftime('%m%d%H%M%S') + ".wav"
7    with open(f"{fname}", "wb") as f:
8        f.write(request.files['data'].read())
9    print(f"posted sound file: {fname}")
10    return jsonify({"data": fname})
With this, files like 1104235900.wav will accumulate directly under sounds/.
Sending the saved file path via osc
Personally, I want to use this application in a performance, so I'll try sending a message via osc when the sound file is saved. I believe this will make it easier to load sound files in real-time using Max/MSP or Max for Live on the local PC acting as a server.
We will use a package called pythonosc. (Install with pip install python-osc)
python-osc PyPI: https://pypi.org/project/python-osc/
1from pythonosc import dispatcher, osc_message_builder, osc_server, udp_client
2
3
4address = "127.0.0.1"
5port = 5050
6client = udp_client.UDPClient(address, port)
7
8
9def send_osc(msg):
10    msg_obj = osc_message_builder.OscMessageBuilder(address=address)
11    msg_obj.add_arg(msg)
12    client.send(msg_obj.build())
This is fine. Then, if you do send_osc(fname) inside the uploaded_wav() mentioned above, the file path will arrive as a message. In Max, if you do [udpreceive 5050], you can play it with open & sfplay~.
p5.js
p5js.org: https://p5js.org/
It's like Processing where you can manipulate the DOM, and since it draws on a Canvas element, you don't have to draw complex animations with CSS. It might be easier if the browser supports canvas. Also, there is a Web Editor (https://editor.p5js.org/), which is very easy to get started with because you can test the behavior without setting up an environment.
If you want to introduce TypeScript, you should first use the following repository (it was very easy).
Gaweph/p5-typescript-starter
Base starter project using p5js and typescript: Contribute to Gaweph/p5-typescript-starter development by creating an account on GitHub.
And I referred to the following entries:
- Setting up a Processing (p5.js) environment with TypeScript + webpack - Qiita
- Created an environment where P5.js can be written in TypeScript for CreativeCoding. - Qiita
After that, just write it quickly. As an example, I'll leave the class for the recording button part of the UI...
1class Button {
2  private w: number;
3  private h: number;
4  private centerX: number;
5  private centerY: number;
6  private radius: number;
7  private isRecording: boolean;
8  private rectCircleRatio: number;
9  private progress: number; // 0 ~ 300 value (about 5s)
10
11  constructor(w: number, h: number, size: number) {
12    this.w = w;
13    this.h = h;
14    this.centerX = w / 2;
15    this.centerY = h / 2;
16    this.radius = size;
17    this.isRecording = false;
18    this.rectCircleRatio = size / 2;
19    this.progress = 0;
20  }
21
22  isTouched(x: number, y: number) {
23    if ((x - this.centerX) ** 2 + (y - this.centerY) ** 2 < this.radius ** 2) {
24      return true;
25    }
26    return false;
27  }
28
29  switchRecording() {
30    this.isRecording = !this.isRecording;
31    console.log(`switched to recording: ${this.isRecording}`);
32    if (this.isRecording) {
33      startRecording();
34    } else {
35      this.progress = 0;
36      stopRecording();
37    }
38  }
39
40  draw() {
41    if (this.progress == 300) {
42      this.progress = 0;
43      this.switchRecording();
44    }
45    if (this.isRecording) {
46      if (this.rectCircleRatio > 5) {
47        clear();
48        this.rectCircleRatio -= 5;
49      }
50      this.progress++;
51    } else {
52      if (this.rectCircleRatio <= this.radius / 2) {
53        clear();
54        this.rectCircleRatio += 5;
55      }
56    }
57    drawCircleUI((this.progress * 2 * PI) / 300);
58    noStroke();
59    fill(mainColor);
60    rect(
61      this.centerX - this.radius / 2,
62      this.centerY - this.radius / 2,
63      this.radius,
64      this.radius,
65      this.rectCircleRatio,
66    );
67    // text
68    fill(white);
69    textAlign(CENTER, CENTER);
70    textSize(16);
71    if (this.isRecording) {
72      text("STOP", this.centerX, this.centerY);
73    } else {
74      text("REC", this.centerX, this.centerY);
75    }
76  }
77}
Repository
atsukoba/AudioSampleRecorder
Audio recording on the Web using Web Audio API for remote real-time environmental sound collection. python3 and packages listed in requirements.txt nodejs and packages listed in package.json tmux ngrok recorder-js git clone -r https://github.com/atsukoba/AudioSampleRecorder.git npm install sh ngrok-install.sh then put your ngrok auth-token if using pip and HomeBrew, run this prepared script.
You can actually use it, so please do if you feel like it. Like osc-webapp, it is published by digging an https tunnel with ngrok. (You can't use the Web Audio API unless it's https)