Web Audio API のラッパーである recorder.js を用いて簡易レコーダーを作成します。ブラウザ版 Processing である p5.js を ts で書いて UI 実装します。
フィールドレコーディング:スタジオ外での自然音や環境音の録音 自然音や環境音を手軽に集めたい,そしてそれを PC へ送りリアルタイムに処理したい,といったニッチな要望に応えるものを作った感じです
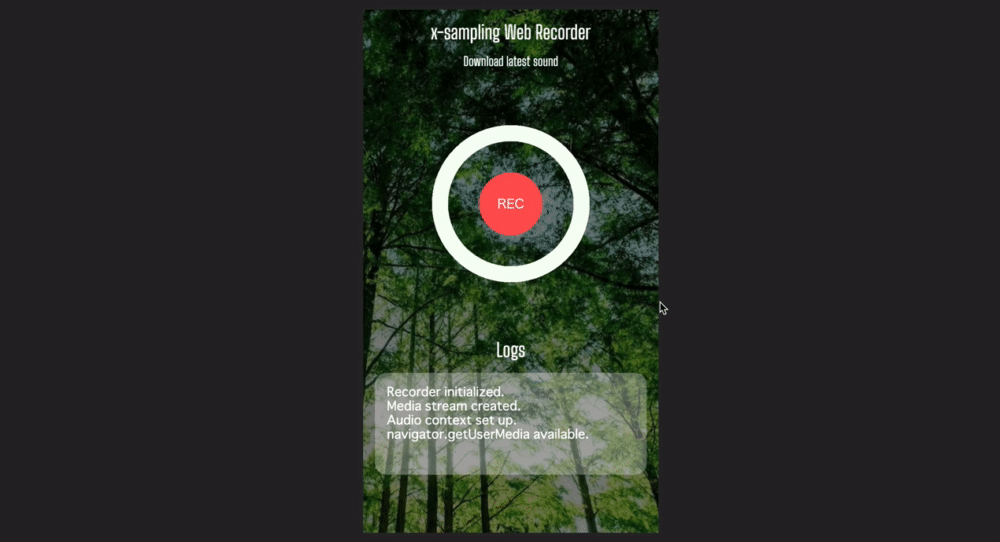
完成イメージ
イメージといってもスクリーンショットなんでこういう感じで動きます。
(たぶん)ササっと環境構築して動かせるので興味ある方は是非。
recorderjs でフロント側で音声録音する
GitHub: https://github.com/mattdiamond/Recorderjs
まずデモはこちらSimple Recorder.js demo
Web Audio API のラッパーみたいな感じでしょうか。AudioNode のインスタンスを渡せば簡単に録音スタート・ストップ・保存ができる,という優れモノ。
以下のような感じで録音開始の関数定義ができるので,任意のイベントで呼べば良い。
let recorder: Recorder

const startUserMedia = (stream: MediaStream) => {
  audio_context = new AudioContext()
  let input: AudioNode = audio_context.createMediaStreamSource(stream)
  recorder = new Recorder(input)
}

const startRecording = () => {
  recorder && recorder.record()
}
で,このRecorder.exportWAV()メソッド一発で wav の Blob オブジェクトが手に入るので,ソレを ajax で POST してあげれば良い。
recorder &&
  recorder.exportWAV((blob: Blob) => {
    let url = URL.createObjectURL(blob)
    let fd = new FormData()
    fd.append('data', blob)
    $.ajax({
      type: 'POST',
      url: '/',
      data: fd,
    }).done((data) => {
      recorder.clear()
    })
  })
flask で POST された wav ファイルを保存する
flask 側ではこんな感じに書けば良い。
from flask import Flask, jsonify, request


@app.route('/', methods=['POST'])
def uploaded_wav():
    fname = "sounds/" + datetime.now().strftime('%m%d%H%M%S') + ".wav"
    with open(f"{fname}", "wb") as f:
        f.write(request.files['data'].read())
    print(f"posted sound file: {fname}")
    return jsonify({"data": fname})
これでsounds/直下に1104235900.wavみたいなファイルがどんどん溜まっていく。
保存されたファイルのパスを osc で送る
個人的にこのアプリケーションをパフォーマンスで使用したいので,サウンドファイルが保存されたタイミングで osc にメッセージを飛ばしてみる。コレで例えばサーバとなっているローカルの PC で Max/MSP や Max for Live を用いたリアルタイムでのサウンドファイル読み込みがラクになる(と信じている)
pythonoscというパッケージを用いる。(pip install python-oscで入る)
python-osc PyPI: https://pypi.org/project/python-osc/
from pythonosc import dispatcher, osc_message_builder, osc_server, udp_client


address = "127.0.0.1"
port = 5050
client = udp_client.UDPClient(address, port)


def send_osc(msg):
    msg_obj = osc_message_builder.OscMessageBuilder(address=address)
    msg_obj.add_arg(msg)
    client.send(msg_obj.build())
これで良い。あとは上述のuploaded_wav()内でsend_osc(fname)してあげれば,ファイルパスがメッセージとして届く。Max なら[udpreceive 5050]しておけば open&sfplay~して再生できる。
p5.js
p5js.org: https://p5js.org/
DOM がいじれる Processing という感じで,Canvas 要素に描画するので CSS で複雑なアニメーションを描いているとかしなくても,canvas が動くブラウザなら良いしこっちのがラクかもしれないです。また,Web Editor(https://editor.p5js.org/) というものがあり,環境構築ナシで挙動が試せるので非常にとっかりやすいと思います。
TypeScript を導入するなら,まず以下のリポジトリを使うべきです(めっちゃラクだった)
Gaweph/p5-typescript-starter
Base starter project using p5js and typescript: Contribute to Gaweph/p5-typescript-starter development by creating an account on GitHub.
かつ,以下のエントリを参考にしました
- TypeScript+webpack で Processing(p5.js)の環境を構築する - Qiita
- CreativeCoding 用に P5.js が TypeScript で書ける環境をつくった。 - Qiita
あとは,ササっと書いていくだけです。例として UI の録音ボタンの部分のクラスをおいておきます…
class Button {
  private w: number
  private h: number
  private centerX: number
  private centerY: number
  private radius: number
  private isRecording: boolean
  private rectCircleRatio: number
  private progress: number // 0 ~ 300 value (about 5s)

  constructor(w: number, h: number, size: number) {
    this.w = w
    this.h = h
    this.centerX = w / 2
    this.centerY = h / 2
    this.radius = size
    this.isRecording = false
    this.rectCircleRatio = size / 2
    this.progress = 0
  }

  isTouched(x: number, y: number) {
    if ((x - this.centerX) ** 2 + (y - this.centerY) ** 2 < this.radius ** 2) {
      return true
    }
    return false
  }

  switchRecording() {
    this.isRecording = !this.isRecording
    console.log(`switched to recording: ${this.isRecording}`)
    if (this.isRecording) {
      startRecording()
    } else {
      this.progress = 0
      stopRecording()
    }
  }

  draw() {
    if (this.progress == 300) {
      this.progress = 0
      this.switchRecording()
    }
    if (this.isRecording) {
      if (this.rectCircleRatio > 5) {
        clear()
        this.rectCircleRatio -= 5
      }
      this.progress++
    } else {
      if (this.rectCircleRatio <= this.radius / 2) {
        clear()
        this.rectCircleRatio += 5
      }
    }
    drawCircleUI((this.progress * 2 * PI) / 300)
    noStroke()
    fill(mainColor)
    rect(
      this.centerX - this.radius / 2,
      this.centerY - this.radius / 2,
      this.radius,
      this.radius,
      this.rectCircleRatio,
    )
    // text
    fill(white)
    textAlign(CENTER, CENTER)
    textSize(16)
    if (this.isRecording) {
      text('STOP', this.centerX, this.centerY)
    } else {
      text('REC', this.centerX, this.centerY)
    }
  }
}
リポジトリ
atsukoba/AudioSampleRecorder
Audio recording on the Web using Web Audio API for remote real-time environmental sound collection. python3 and packages listed in requirements.txt nodejs and packages listed in package.json tmux ngrok recorder-js git clone -r https://github.com/atsukoba/AudioSampleRecorder.git npm install sh ngrok-install.sh then put your ngrok auth-token if using pip and HomeBrew, run this prepared script.
実際に活用できるので気が向いたらどうぞ。osc-webappと同じく,ngrok で https トンネルほって公開してます。(https じゃないと Web Audio API が使えない)